Since there are so many different options for when to run a transform script, it can be difficult to determine what will work best for your application. In this post, I’ll go over the different types of scripts as well as the variables that are available to each one. ServiceNow has some documentation on how to map with transform event scripts that I used as a reference while I was playing around with transform maps. I’ll just dive a little deeper into those concepts in this post. The following scripts are listed in the order that they execute in.
The following scripts are listed in the order that they execute in:
![]()
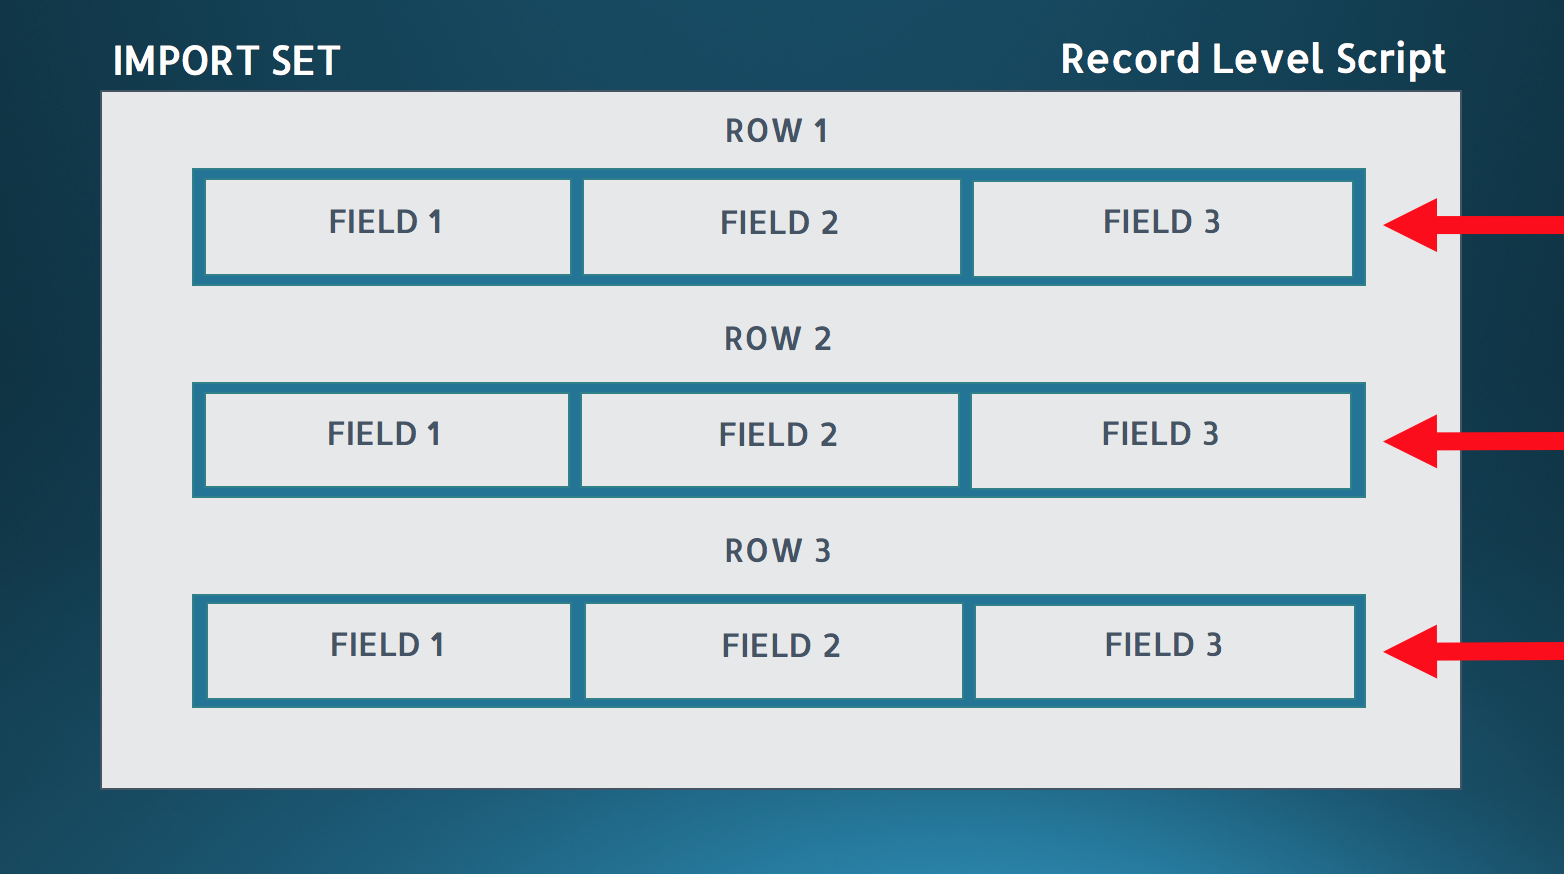
Below is a diagram of a sample import set. Each script will have another diagram that shows when they run.
![]()
On Start
Variables: source, import_set, map, log, ignore, error
Note: Only the variables listed above apply to the current script. A list of all the variables and how they work can be found at the bottom of the post.
![]()
Summary: onStart runs at the very beginning of the import before any of the records are processed. None of the fields can be accessed on the source or target tables since they have not been set up yet. If you try to access fields in the onStart script, the transform will not run. If you wanted to inform a user that more records were being imported, you could use the onStart script to send out the message that the import has started.
On Before
Variables: source, target, import_set, map, log, action, ignore, status_message, error, error_message
![]()
Summary: onBefore runs before every row is processed. This script runs for each individual record. If you want to set or alter values on the source table (see Temperature example explained in the Field Level Source Script section below) it can be done here. onBefore scripts can be used to verify that the value of a source field is valid. If the value is invalid, the script can take action.
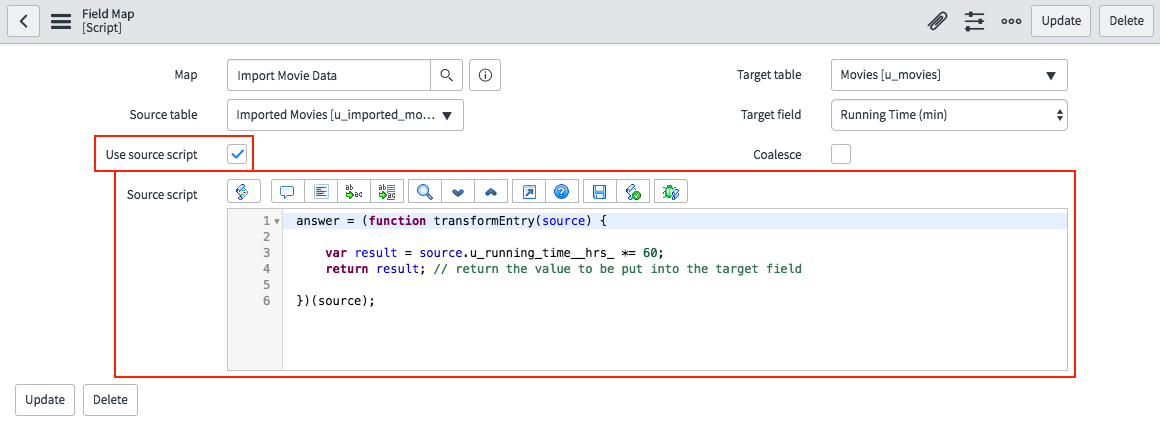
Field Level Source Script
Variables: source, target, answer, map, log, action
![]()
![]()
Summary: The source script replaces the source field in the field map. It gives the target field a value. This is used when you want to change an individual field on each record. For example, if I had a Temperature field in my source table that was in Fahrenheit and I wanted it to be in Celsius on my target table, I would do the conversion in the field level source script. This will modify the temperature value for every record.
On Foreign Insert
Variables: source, target, map, log, action, name, value, action, ignore, error
![]()
Summary: onForeignInsert runs before a new referenced record is created. Since this script only runs on an insert, the choice action “create” has to be selected for that field map. If “create” is not selected, the script will never run.
![]()
At this point, we can access values on the source table. Fields on the target table, however, have not yet been modified. onForeinInsert scripts can manage what happens when a new record is added to a referenced table, such as filling out other fields on that table.
On Choice Create
Variables: source, target, map, log, action, name, value, ignore, error
![]()
Summary: onChoiceCreate runs before a new choice is created on a choice field. Since this script runs when a choice is created, “create” has to be selected as the choice action for that field map. If it is not selected, the script will not run. Because onChoiceCreate is a before action, only the source table record has set values. Similar to onForeignInsert, the onChoiceCreate script can take additional action when a new choice is created on a field.
On Reject
Variables: source, target, map, action, log
![]()
Summary: onReject runs before a record (often a referenced record) is rejected. In order for this script to run, “reject” has to be selected as the choice action for that field map.
![]()
Since onReject runs before the record is rejected, the value of the fields in the source table can still be accessed and stored. Once the script runs, the record is rejected and is not inserted into the target table. The onReject script is useful for gathering information about the rejected record and storing it or reporting it back to the user.
Record Level Script
Variables: source, target, map, log
![]()
![]()
Summary: Record level scripts run alongside the field maps as they transform fields from the source table to the target table. Both the target and source tables are accessible for this script. Since the script will execute for every record, the record level script is where you want to alter record values. If I had a Firstname and Lastname field on my source table and I wanted to merge them into a Name field on my target table, I would do that with the record level script since I have access to all the fields in both the source and target tables.
On After
Variables: source, target, import_set, map, log, action, status_message, error, error_message
![]()
Summary: onAfter runs after every row has been processed. Fields on the target table can be accessed from this point. They contain the value that was just inserted. At the time that this script runs, the source and target field values should be the same. With onAfter scripts, you can take the values of the fields that were just inputted and use them to fill out record fields on other tables.
On Complete
Variables: source, target, import_set, map, log, error
![]()
Summary: onComplete runs once the import has been completed and all records have been transformed. The script will only run once. As an example, you could use the onComplete script to send out a message saying that new records have just been added to the table.
Variables
There are many variables that can be used in transform scripts. Here is a list of all the variables and how they work:
action – returns “insert” or “update” depending on if the current record was or is being added or updated
error – a boolean that will stop the transformation and send an error message if set to true
error_message – the message sent if an error occurs
ignore – a boolean that will stop the transformation and ignore all following rows
import_set – the import set being transformed at that moment
log – function used for debugging the transformation (log.info(), log.error(), etc.)
map – information about the transform map record being processed
name – the name of the field on the target record that is currently being processed
source – A GlideRecord of the row being read in and processed
status_message – an output message sent in the XML response
target – A GlideRecord of the record being added to the target table
value – the display value of the field on the source record that is currently being processed


 Sublime Text Plugin for ServiceNow